Vaultwarden ❤️ Tailscale
The following is one of the simpler1 and more-secure ways of setting up a self-hosted Vaultwarden server, using Tailscale for private (and public if desired) connectivity, all in Docker. It assumes you already have somewhere to run Docker containers and a Tailscale network set up for the devices that you’d like to use Vaultwarden. If you can docker run hello-world and see at least one machine at https://login.tailscale.com/admin/machines, you’re good to go.
Vaultwarden’s an unofficial open-source rewrite of the Bitwarden server. Bitwarden also provide an official open-source release, however it’s fairly resource heavy and it’s unclear if there are any benefits over Vaultwarden. Why self-host? There are myriad reasons why you might want to run your own services; I won’t delve into those here - rather, I presume you’re looking for the simplest and “most secure” (least exposed to the Internet) arrangement for self-hosting Vaultwarden.
For my setup I have an old Synology NAS (DSM 7.2) and a free/personal Tailscale account with a dozen devices on my Tailscale network (or as Tailscale call it, the tailnet). On the mobile devices I’m using app-based split tunnelling to direct the Bitwarden app via the Tailscale VPN yet leave the heavier but less important traffic such as streaming media unprotected. Works very well.
Benefits of this approach:
- about as simple as it gets, aside from just signing up to a free Bitwarden plan ;-)
- the Vaultwarden server is not exposed to the Internet
Cons:
- requires a Tailscale service
- requires all devices to be directly part of the Tailscale network (tailnet) to access the vault server
- Bitwarden clients will function in read-only mode for up to 90 days when not connected to the server
- Tailscale can route non-Tailscale devices (subnet routers), but won’t Serve to those devices (each Bitwarden client will need to be a Tailscale client)
On the Tailscale dependency: much as Bitwarden has done for Vaultwarden, Tailscale open-source their clients on open-source platforms; and akin to Bitwarden/Vaultwarden there’s also a third-party open server implementation called Headscale. So self-hosting a tailnet is possible though not for the purposes of Vaultwarden at this time: Headscale currently doesn’t support tailscale serve for HTTPS (ref Headscale #1921). Once that issue is resolved presumably you’ll be able to replace Tailscale with your own Headscale. For the record, though I prefer to minimise dependencies and like the idea of 100% open code, practically I see the Tailscale implementation as a reasonable compromise.
This work riffs off many others, including the Tailscale blog (understandably, that guide omits most of the non-Tailscale setup). Most other guides are focused on making the Vaultwarden server available on the Internet - which is not necessary in a Tailscale BeyondCorp/”Zero Trust” environment!
Overall Approach
Vaultwarden runs within a Docker multi-container application (aka compose, Synology call this a Project) with Tailscale running in one container and Vaultwarden on the other. Docker’s network_mode feature is used to connect both containers to the same networking namespace, this simplifies the networking setup. Tailscale’s Serve and certificate features are used to acquire a valid TLS certificate for the service and expose it to the tailnet (and optionally, to the Internet by turning on Funnel).
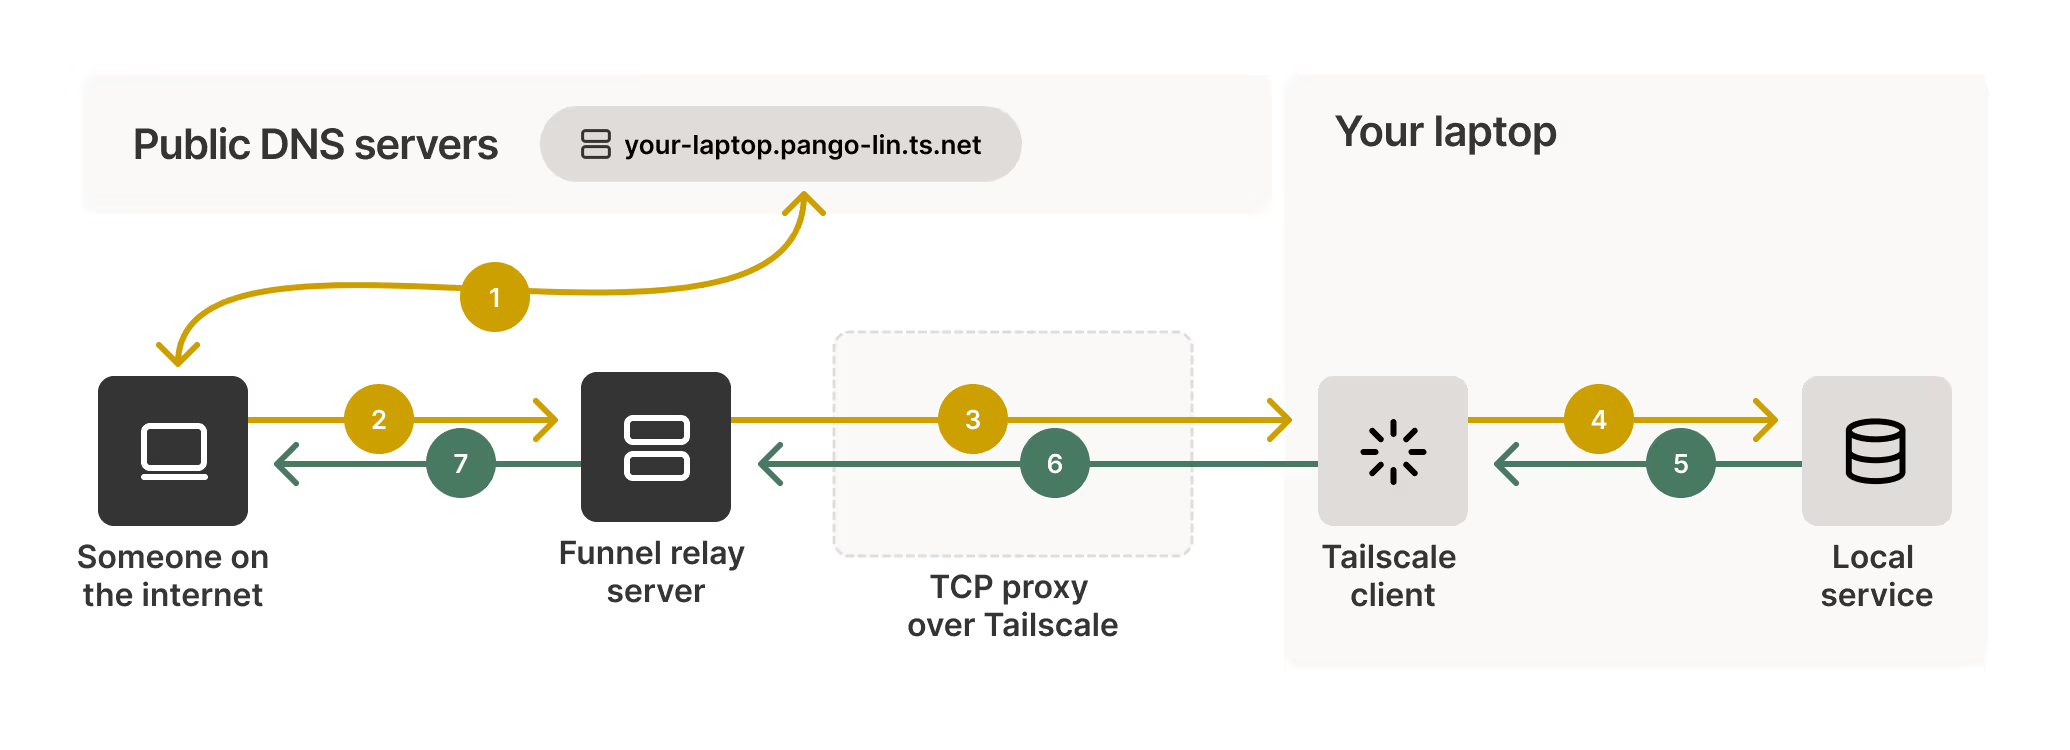 Tailscale Funnel - Serve is much the same, only without the Internet and relay server
Caveat Infundibulum - Beware of the Funnel
Enabling Funnel for the Vaultwarden containers will allow Bitwarden clients to access the Vaultwarden server without needing to be on your tailnet or even install Tailscale. However the hazard with any service exposed via Funnel is that a vulnerability in the funnelled application could be used by a malicious actor to gain access to your Tailnet. I would not enable Funnel without isolating the host from my local network (containers are not a security boundary) and setting up appropriate Tailscale policies to deny access from the node to the rest of the tailnet.
If you were tempted to consider “who’s going to find my Vaultwarden instance at
vw.tailfe8c.ts.net” - security by obscurity is never much chop and you certainly can’t rely on hiding behind your opaque tailnet’s name: every time Tailscale acquires a TLS certificate on your behalf the public certificate infrastructure records the name in the public Certificate Transparency logs. e.g. https://crt.sh/?q=pango-lin.ts.net shows the node names associated with the Tailscale team’s demo tailnet (reporting on the entirets.netdomain crashescrt.sh, however I expect there are malicious actors watching thets.netCT logs to pounce on accidental Funnel exposures).
The Vaultwarden instance uses the default SQLite (file) database. This is more than sufficient for a handful of clients.
Note that Tailscale may also be running on the Docker host itself, but that’s independent of the Vaultwarden instance. For example I have the NAS connected to Tailscale, both it and the Vaultwarden instance appear as distinct nodes in my tailnet. I expect it’s possible to serve the Vaultwarden container via the host’s Tailscale though I don’t see any advantage in that approach - indeed keeping them distinct means I can use a tailored tailnet node name (e.g. vaultwarden) and can move the containers to another Docker host with little fuss.
Setup
The setup is in three main steps:
- creating the initial Docker compose with only Tailscale and connecting it to the tailnet
- adding the Vaultwarden container and initial setup
- completing the Vaultwarden config
Vaultwarden’s Usage will get you up and running with a Vaultwarden server but it’ll be incomplete; there are a few more tasks that should be done to fully configure the service.
The process is simplest to do in parts as:
- Tailscale has an once-off “add node to tailnet” step
- setting up and verifying each component makes identifying and troubleshooting issues simpler than bringing everything up at once
Prework
The following is well covered by the vendor documentation:
- set up Docker with the Compose plugin
- for the Synology NAS, you’ll need to install Synology’s official Container Manager package and may need to create a
dockerShared Folder (via the Control Panel) - Colima also works well on macOS and Linux
- likely a good idea to test things out before proceeding by making sure the Docker Compose Quickstart works
- for the Synology NAS, you’ll need to install Synology’s official Container Manager package and may need to create a
- set up Tailscale such that
tailscale serveis working
Acquire Tailscale Authentication Key
The Tailscale blog discusses the node authentication options, the OAuth approach appears to have no advantages over the simpler Auth Key for this use case, where being fussy about API scopes is not in scope.
Head over to Tailscale’s admin panel and create an Auth Key for the new tailnet node/server: Settings > Personal Settings > Keys. All auth key settings should be at their defaults, which are:
- non-reusable (we only need to add the node once)
- expiration: doesn’t matter (could be 1 day assuming you’re charging through this entire process)
- ephemeral: off (keep the node in place even if it’s offline/stopped)
- tags: none (unless you’re using Tailscale’s fancier features such as ACL policies, in which case - have at it)
You should now have a string that starts with tskey-auth-, you’ll need this to add to the Docker compose file below.
Docker and Tailscale Initial Setup
I’m running these containers on an x86-based Synology NAS (a 2016-era DS916+ with 2GB RAM, lightly loaded), I expect any Docker host to work (this is, after all, the whole point of Docker).
For Docker hosts other than the Synology, follow the relevant instructions for your Docker environment, e.g. Docker Compose Quickstart, using the folder structure and compose file given below.
1. Create Persistent Storage on the Docker Host
Create a folder hierarchy as follows (for the Synology NAS: via the File Station app):
1
2
3
4
5
/docker/vaultwarden/
/docker/vaultwarden/data/
/docker/vaultwarden/tailscale/
/docker/vaultwarden/tailscale/state/
/docker/vaultwarden/tailscale/config/
I’m using host mounts rather than Docker volumes to simplify backing up the Vaultwarden data and be able to easily edit the Tailscale config.
On my NAS, the above paths are under /volume1/ in the NAS’ filesystem. No special permissions are required.
2. Create a Container Manager Project with Tailscale Node
Open the Synology Container Manager app and create a new project with the following ‘General Settings’:
| Section | Setting | Comment |
|---|---|---|
| Project Name: | vaultwarden | only relevant within Container Manager |
| Path: | /volume1/docker/vaultwarden | browse to the vaultwarden folder created above |
| Source: | Create docker-compose.yml | Despite the label in the Synology UI the compose file will be named compose.yaml, not docker-compose.yml (as it should be) |
Enter the following near-minimal configuration in the compose text box:
1
2
3
4
5
6
7
8
9
10
11
12
13
14
15
16
17
18
## part 1: tailscale, alone
---
services:
  ts-vaultwarden:
    image: tailscale/tailscale:latest
  container_name: ts-vaultwarden
  environment:
      - TS_HOSTNAME=vaultwarden
      - TS_AUTHKEY=tskey-auth-kCNNdU...-hW8rd...8ZDL
      - TS_STATE_DIR=/var/lib/tailscale
    volumes:
      - ./tailscale/state:/var/lib/tailscale
    devices:
      - /dev/net/tun:/dev/net/tun
    cap_add:
      - net_admin
      - sys_module
    restart: unless-stopped
- some other guides include a
versionelement; this is obsolete - the hostname (as known to Vaultwarden/Bitwarden clients) will be that of the Tailscale node;
TS_HOSTNAMEis used to give this a useful name (vaultwarden) - by default it’ll be the container’s name- alternatively, the tailnet name could be set via setting the container’s
hostname(Tailscale defaults to using the host’s name; yet another alternative would be to rename the node in the Tailscale admin dashboard) - the
container_nameandhostnameserve two distinct purposes: the former is used to reference the Tailscale container within Docker; the latter sets the OS hostname within the Tailscale container - the container and host names are arbitrary, but make sure to be consistent
- alternatively, the tailnet name could be set via setting the container’s
- the
TS_AUTHKEYvariable is only required to join the node; once joined it can be removed from the compose file - volume mounts:
- the host paths (left-hand-side) are relative to the
compose.yamlfile, i.e. the Path selected above - Tailscale maintains its state in the
/var/lib/tailscale/directory (path can be configured viaTS_STATE_DIR) - should be kept in persistent storage, hence the volume mount
- the host paths (left-hand-side) are relative to the
the
cap_addcontainer capabilities anddeviceselements are per Tailscale’s doc and blog post- it’s often a good idea to use Docker’s
healthcheckfeature to ensure the container is genuinely operational and not just “up”- Tailscale provides a healthcheck endpoint:
TS_ENABLE_HEALTH_CHECK(disabled by default) - in this case there doesn’t seem much utility in adding an explicit healthcheck as
tailscaled(and thus the container) will just exit on failure
- Tailscale provides a healthcheck endpoint:
On the Synology, hit Next and Container Manager will prompt to enable the “web portal”, which is Synology’s reverse proxy solution. It’s not required for this setup, so just hit Next and then Done. This should result in Container Manager building and starting the container - all going well, it’ll show up in the Tailscale admin dashboard and you’ll be able to ping the node from other devices on the tailnet.
An artefact of using an auth key will be a finite key lifetime for the new node, after which time it’ll be kicked off the tailnet - use the dashboard to disable key expiry.
Verification and Troubleshooting
At this point the new node should appear on the tailnet and be listed on the Tailscale admin machines page. The auth key will have been used, and should be listed in the “recently invalidated keys” section of the Tailscale dashboard Settings page. If the key’s still listed as valid, it means the container was not able to get to a point where the tailscaled service was executed, or there was some connectivity error that prevented the connection.
If you want to recreate a node from scratch (for example, to validate the instructions in a “how to” guide 🙄) be aware that the node “state” exists in three places:
- the auth token: single-use, expires once used (by default)
- the Tailscale machine list https://login.tailscale.com/admin/machines
- the local Docker host’s volume mount (e.g.
./tailscale/state)
To reset: stop the container, remove the data in the state directory, remove the host from the tailnet, and then you’re ready to proceed with creating a new auth token to provide via the compose file.
To debug any issues: check the container logs (on Synology: Container > ts-vaultwarden > Details: Logs) - be aware that as the container is set to automatically restart, this can (will) push errors back up in the log history; use the search feature to search for “error”.
A misconfiguration of the Tailscale environment can cause Tailscale to exit somewhat abruptly. As a preview of the next section: setting TS_SERVE_CONFIG to an invalid path will emit the following log entry but then exit with no further fanfare:
1
serve proxy: failed to read serve config: open [path]: no such file or directory
At this point TS_SERVE_CONFIG should not be set, that’s next.
Adding Vaultwarden
The previous section ought to have resulted in a Tailscale docker instance up and running and connected to your tailnet. Next step is to connect it to a container running Vaultwarden.
- Stop the container (Synology: stop the project, or
docker compose down) - Edit the compose file to add the new Vaultwarden container, as below
1
2
3
4
5
6
7
8
9
10
11
12
13
14
15
16
17
18
19
20
21
22
23
24
25
26
## part 2: vaultwarden with tailscale sidecar
---
services:
  ts-vaultwarden:
    image: tailscale/tailscale:latest
    container_name: ts-vaultwarden
    environment:
      - TS_HOSTNAME=vaultwarden
      - TS_STATE_DIR=/var/lib/tailscale
    volumes:
      - ./tailscale/state:/var/lib/tailscale
    devices:
      - /dev/net/tun:/dev/net/tun
    cap_add:
      - net_admin
      - sys_module
    restart: unless-stopped
  vaultwarden:
    image: vaultwarden/server:latest
    container_name: vaultwarden
    network_mode: service:ts-vaultwarden
    depends_on:
      - ts-vaultwarden
    restart: unless-stopped
    volumes:
      - ./data/:/data/
TS_AUTHKEYis removed as it’s no longer needed (no real harm in leaving it though)
Start the containers (project/compose up).
Once they’re up, you should be able to connect to the HTTP (not HTTPS) Vaultwarden endpoint from any other host on your tailnet: http://vaultwarden.your-tailnet.ts.net.
Hold up, don’t log in yet - that non-TLS connection will not do.
Tailscale Serve
Tailscale’s serve provides a few features including a HTTPS-capable reverse proxy, which we’ll use to proxy traffic from other tailnet nodes to Vaultwarden. Tailscale handles acquiring a valid TLS certificate and renewing it at the right time(s).
1. Create the Tailscale Serve Config File
Tailscale serve can be configured via a via a JSON file given in TS_SERVE_CONFIG ; per the Tailscale docs when using a bind mount as we are here, the directory containing the file rather than the file itself must be mounted.
The config file can be made generic by using a variable in place of the proscribed tailnet node name (though this appears to be not documented anywhere outside of a blog post). In any event, copy the following to the Docker host as ./tailscale/config/vaultwarden.json:
1
2
3
4
5
6
7
8
9
10
11
12
13
14
15
16
{
  "TCP": {
    "443": {
      "HTTPS": true
    }
  },
  "Web": {
    "${TS_CERT_DOMAIN}:443": {
      "Handlers": {
        "/": {
          "Proxy": "http://127.0.0.1:80"
        }
      }
    }
  }
}
- the template provided by the above Tailscale blog includes an
AllowFunnelobject with the node set to false; this tells Tailscale to not proxy the service to the open Internet - unfortunately a Tailscale dashboard UI bug #11572 will incorrectly report the node is exposed; omitting theAllowFunnelobject entirely resolves this errant behaviour
2. Serve Hot
Once more:
- Stop the container (Synology: stop the project, or
docker compose down) - Edit the compose file to add the
TS_SERVE_CONFIGenvironment variable and additionalvolumemount, as below
1
2
3
4
5
6
7
8
9
10
11
12
13
14
15
16
17
18
19
20
21
22
23
24
25
26
27
28
## part 3: vaultwarden served via tailscale
---
services:
  ts-vaultwarden:
    image: tailscale/tailscale:latest
    container_name: ts-vaultwarden
    environment:
      - TS_HOSTNAME=vaultwarden
      - TS_STATE_DIR=/var/lib/tailscale
      - TS_SERVE_CONFIG=/config/serve.json
    volumes:
      - ./tailscale/state:/var/lib/tailscale
      - ./tailscale/config:/config
    devices:
      - /dev/net/tun:/dev/net/tun
    cap_add:
      - net_admin
      - sys_module
    restart: unless-stopped
  vaultwarden:
    image: vaultwarden/server:latest
    container_name: vaultwarden
    network_mode: service:ts-vaultwarden
    depends_on:
      - ts-vaultwarden
    restart: unless-stopped
    volumes:
      - ./data/:/data/
- to be clear, two lines were added
- under
environment:- TS_SERVE_CONFIG=/config/serve.json - under
volumes:- ./tailscale/config:/config
- under
- start ‘em up and wait a bit
- the TLS certificate acquisition can take a short time and that can’t happen until after the container’s started, the tailnet established (including NAT traversal if needed) and the certificate process started, so the initial connection will appear to hang until that’s all complete - could be upwards of 60s; review the Tailscale container logs to keep an eye on the process
- after the wait, confirm you:
- can reach your node via HTTPS from within the tailnet:
https://vaultwarden.your-tailnet.ts.net, and - can not reach it from outside the tailnet (e.g. temporarily turn Tailscale off on your client)
- beware browser caching (do a browser hard refresh)
- can reach your node via HTTPS from within the tailnet:
Vaultwarden Setup
Now that Vaultwarden is up and running, it’s time to configure it. The Vaultwarden wiki doesn’t (yet!) clearly document all of the options however most are described in .env.template - any others require reading the code: config.rs.
Vaultwarden reads its configuration from a number of sources, in order of lowest to highest precedence:
- environment variables (e.g. defined in the docker compose file and populated into the resulting docker container)
- environment file (environment variables defined in a file), specified by
ENV_FILE(default is.env)- i.e. one environment variable pointing to a file full of environment variables, the file typically being a mounted volume when using Docker - thereby allowing config changes to be made by just restarting but not rebuilding the container; the env file also supports comments (
#)
- i.e. one environment variable pointing to a file full of environment variables, the file typically being a mounted volume when using Docker - thereby allowing config changes to be made by just restarting but not rebuilding the container; the env file also supports comments (
- a config file (
config.json)- in turn, the admin panel which commits its configuration - in its entirety - to
config.json
- in turn, the admin panel which commits its configuration - in its entirety - to
If the same option is defined in multiple places: the environment variable is overridden by the one in the environment file, and overridden again by the option in the config file. See below for a rather significant ‘gotcha’ if using the admin panel.
FTR, Vaultwarden doesn’t accept configuration options as command line arguments. It also doesn’t appear to be able to reload changes to an environment file or config file, a restart is necessary except for changes made via the admin panel (undocumented, but implied).
Gotchas
There are myriad ways of setting an environment variable. Docker supports variables ‘baked-in’ to the image at build time (e.g.
ENV), and/or set in the container at run time (e.g. via compose’senvironment, or environment file optionenv_file, or by way ofdocker runarguments). The Dockerenv_file(on the Docker host) is separate to Vaultwarden’sENV_FILE(in the Docker container), using both is likely to be very confusing especially if they point to different files. I recommend only using Vaultwarden’sENV_FILEfor this application.Using the Vaultwarden admin panel (below) to change even one option will create a fully-populated config file - this will have the effect of “locking out” any subsequent changes made via the environment. This can be particularly confusing with regard to the
ADMIN_TOKEN, see the discussion below.
Sometimes the value for a given option may need to be read from a file instead of given directly; this can be helpful to avoid committing sensitive data to git and so on. When an option is suffixed with _FILE with a value of a file path, Vaultwarden will read that option’s value from the given file. See the Vaultwarden doc for an example.
The Vaultwarden documentation recommends using environment variables over using the admin panel (in turn generating a config.json file). There are some options that can only be set via environment variables (marked as “read only” in the admin panel).
Enabling the Admin Panel
Enabling the Admin panel (/admin) exposes pages to:
- change some Vaultwarden settings
- manage users (list, create/invite, suspend and delete)
- manage organisations
- view a diagnostics ‘server status’ page
The user, organisation and diagnostics pages can be useful, the settings page not so much.
The Admin panel is disabled by default, to enable it requires a password hash to be created and provided to Vaultwarden, conventionally via the environment variable ADMIN_TOKEN. The hash can be generated by Vaultwarden itself or other tools, e.g. using the CLI on the Synology NAS:
1
2
3
4
5
6
bash-4.4# docker run --rm -it vaultwarden/server /vaultwarden hash
Generate an Argon2id PHC string using the 'bitwarden' preset:
Password:
Confirm Password:

ADMIN_TOKEN='$argon2id$v=19$m=65540,t=3,p=4$wdbBisDsCSUEJxD4XXbcUPGLl/kt0cxeZE3Of0HeAYo$w7cSYAThq/Lqv3sHBW7qCr8rK64odgnuU2tk0DTZz0w'
The output is for the shell (single quotes), whilst that’s also a valid YAML quoted literal string, Docker compose will attempt to interpolate the string and fail miserably - replace all $ characters with $$ to use that environment variable in a compose file.
Be aware that changing the admin token in the /admin Settings and saving it to file will neuter the token in the environment variables. i.e. if you set ADMIN_TOKEN as an environment variable to turn on the Admin panel and subsequently switch over to using the config file by clicking the /admin Settings > Save, you will now have an admin token set in two different places. When you later update one of them you have a 50:50 chance of headscratching. When using /admin Settings, the original ADMIN_TOKEN environment variable should be removed from the Docker compose. See below for another approach.
The Vaultwarden /admin Settings page may be a convenient way of configuring some aspects of a Vaultwarden instance however as noted above will essentially void any subsequent changes in the environment (variables or file). One way to deal with this (#4758): “either: do not use the /admin interface to configure your options and only use the .env; or have the initial very basic read-only options config in your .env and after that modify all non-read-only config options via the /admin interface”. That approach seems very awkward with config split between two places.
Given this, and that some options cannot be set via config.json, it seems prudent to just not use the /admin Settings at all. Unfortunately there appears to be no way of making the Setting page read-only or disabling the “Save” button, so instead we can disable the config file itself by setting CONFIG_FILE=/dev/null. Config changes will then only exist in memory whilst the application is running, persistent changes will need to be committed to a .env file - all in one place.
The resulting compose file now looks like:
1
2
3
4
5
6
7
8
9
10
11
12
13
14
15
16
17
18
19
20
21
22
23
24
25
26
27
28
29
30
31
## vaultwarden and tailscale
---
services:
  ts-vaultwarden:
    image: tailscale/tailscale:latest
    container_name: ts-vaultwarden
    environment:
      - TS_HOSTNAME=vaultwarden
      - TS_STATE_DIR=/var/lib/tailscale
      - TS_SERVE_CONFIG=/config/serve.json
    volumes:
      - ./tailscale/state:/var/lib/tailscale
      - ./tailscale/config:/config
    devices:
      - /dev/net/tun:/dev/net/tun
    cap_add:
      - net_admin
      - sys_module
    restart: unless-stopped
  vaultwarden:
    image: vaultwarden/server:latest
    container_name: vaultwarden
    network_mode: service:ts-vaultwarden
    depends_on:
      - ts-vaultwarden
    environment:
      - ENV_FILE=/data/.env
      - CONFIG_FILE=/dev/null
    restart: unless-stopped
    volumes:
      - ./data/:/data/
with a basic .env file (saved to ./data/.env on the docker host), set ADMIN_TOKEN and DOMAIN to your values:
1
2
3
4
5
6
7
## to generate a hash: docker run --rm -it vaultwarden/server /vaultwarden hash
ADMIN_TOKEN='$argon2id$v=19$m=65540,t=3,p=4$wdbBisDsCSUEJxD4XXbcUPGLl/kt0cxeZE3Of0HeAYo$w7cSYAThq/Lqv3sHBW7qCr8rK64odgnuU2tk0DTZz0w'

DOMAIN=https://vaultarden.yourtailnet.ts.net

## Tailscale's proxy sets X-Forwarded-For as the originating IP address
IP_HEADER=X-Forwarded-For
The above results in all configuration being defined in a single .env file, and that configuration can be relied upon to be applied on every compose ‘up’. Any changes made via the /admin Settings will be discarded when the containers are restarted. By all means use the /admin Settings to make changes, when you’re happy with the setup codify it by editing the env file and recreating the container to “make it so”. This also allows temporarily enabling some options, e.g. allowing signups, which could automatically revert back to a “safe” setting (SIGNUPS_ALLOWED=false) on restart.
Docker Restart/Stop/Start/ != Down/Up
An alternative to
/dev/nullis to use a location within the container filesystem that is not in a volume, such as/tmp/config.json- this will cause the config file to be discarded when the container is recreated but will persist when the container is simply restarted. Recall that a container is a read-write runtime layer over the immutable image; this layer is retained after stopping a container (e.g. viadocker compose stop), and will be reused with astart. The container (and other resources) are only discarded on adocker compose down(or on a rebuild after the container configuration is changed). That is, to achieve the above goal to discard an errant config file, the application would need to be restarted viadocker compose down && docker compose up, notrestart. Unfortunately Synology’s Container Manager doesn’t expose the up/down commands, rather only start/stop; they provide “Clean” (rm?) and “Build” commands that delete and recreate and run the image and container; overkill but does the job./dev/nullis simpler.
Recommended/Required Settings
Some Vaultwarden options won’t be functional for Vaultwarden instance that is isolated from the Internet, these are flagged as ‘[not useful for isolated instance]’ below.
| Setting | Value | Description |
|---|---|---|
| ADMIN_TOKEN | hash | as above |
| DOMAIN | <your Tailscale node name> | domain HTTPS URL, absent any trailing / - unfortunately there’s no easy way of automatically extracting the Tailscale name (akin to the TS_CERT_DOMAIN variable above) |
| IP_HEADER | X-Forwarded-For | Tailscale Serve uses X-Forwarded-For (not that it’s documented) |
| SIGNUPS_ALLOWED | false | optional; see below re. managing users when disabled |
| INVITATIONS_ALLOWED | false | probably should be the same as SIGNUPS_ALLOWED |
| SENDS_ALLOWED | false | [not useful for isolated instance] |
| _ENABLE_SMTP | false | sending email is not necessary to run Vaultwarden; RTFM if desired; SMTP is implicitly disabled if no other SMTP-related settings are defined |
An .env file matching the above would be:
1
2
3
4
5
6
7
8
9
10
11
ADMIN_TOKEN='$argon2id$v=19$m=65540,t=3,p=4$wdbBisDsCSUEJxD4XXbcUPGLl/kt0cxeZE3Of0HeAYo$w7cSYAThq/Lqv3sHBW7qCr8rK64odgnuU2tk0DTZz0w'

DOMAIN=https://vaultarden.yourtailnet.ts.net

IP_HEADER=X-Forwarded-For

SENDS_ALLOWED=false
_ENABLE_SMTP=false

SIGNUPS_ALLOWED=false
INVITATIONS_ALLOWED=false
User Identities Look Like Email Addresses
Bitwarden (and thus Vaultwarden) uses email addresses as the user’s ID. Vaultwarden doesn’t actually need to send email to these “addresses”, and any email-like string could be used (i.e. includes an
@). Despite this freedom it would probably be a good idea to stick with using an address or domain you control in the event you later wanted to enable email for the service. Having said that, Vaultwarden’s email addresses can be changed by the user (ref #110).
Managing Users When Signups Are Disabled
It’s not possible to directly add users to Vaultwarden - rather users are invited to create an account themselves so as to set a master password and so on. By default, anyone who can access the Vaultwarden web UI can create an account; for a private instance on a tailnet this is probably fine. If you want more control you can set SIGNUPS_ALLOWEDto false, then only users explicitly invited will be able to create accounts.
The process to invite users with SIGNUPS_ALLOWED disabled:
- enter the user’s address in
/admin> Users > Invite User - the new user visits the Vaultwarden web UI and clicks the ‘Create account’ link at the login page, and using the email address from step 1, creates an account
- attempting to use an email address other than as invited will result in a “Registration not allowed or user already exists” error
Backups
Refer the general Vaultwarden documentation.
Really, it’s long because it doesn’t leave much out - aiming for necessary and sufficient ↩︎